Tag Archive for: API

Unity3D Architectures: Entitas

Unity3D Architectures: Entitas

Unity3D is a powerful suite of tools (Project IDE, Code IDE, run-time) for game development. In Unity3D Game Architectures I present six different techniques for setting up your game. Depending on the size and maturity of your team, you are probably using some form the archtectures presented there. I recommend checking that article out first, then read below.

A newer architecture called Entitas  was presented at Unity’s Unite Conferences (2015 and 2016). I saw the most recent presentation and recently made time for a deeper dive to learn the basics.

I created a few projects. The full source is linked at the end of the article

  • Entitas Template – An ideal starting point for your next Entitas project
  • Entitas ‘Pong’ – I started with the template and created a simple, complete game

While making those projects, reading documentation, and dissecting other freely available Entitas projects, I learned a lot.

Entitas for C# / Unity3D

Entitas is a super fast Entity Component System Framework (ECS) with a version created specifically for C# and Unity3D.

As the creators explain — Entitas is open source. Internal caching and blazing fast component access makes it second to none. Several design decisions have been made to work optimal in a garbage collected environment and to go easy on the garbage collector. Entitas comes with an optional code generator which radically reduces the amount of code you have to write and lets you write code that is super fast, safe and screams its intent.

Here is an excerpt from my Entitas Pong game.

//  Create human player
Entity whitePaddleEntity                     = _pool.CreateEntity ();
whitePaddleEntity.AddPaddle            (PaddleComponent.PaddleType.White);
whitePaddleEntity.AddResource        ("Prefabs/PaddleWhite");
whitePaddleEntity.AddVelocity          (Vector3.zero);
whitePaddleEntity.WillAcceptInput   (true);

Entitas Structure

Diagram Fundamentals
  • Entities – Hold Components – E.g. PlayerEntity
  • Groups – Hold groups of Entities (as a query optimization) – E.g. BulletGroup
  • Components – Hold public variables ( Has no methods) – E.g. VelocityComponent
  • Systems – Query entity/components ( Has methods to do logic ). Most of your code is here, typically acting on one or more groups. E.g. VelocitySystem
  • Controllers – Monobehavior that bridge the ‘unity world’ with the ‘ECS world’. E.g. InputController

Example:

The InputController (Monobehavior) listens for Unity.Input on Update. When the phone’s screen is tapped, the InputController creates an InputEntity, each with an InputComponent with data regarding the tap The InputSystem (ISystem) processes once, only when new InputEntities exist, and it updates the PlayerEntity‘s VelocityComponent. The concept of Velocity is processed separately to update the game properly, etc…

Note: Entitas Components are NOT Unity Components (aka Monobehaviors). Think of an Entitas Component as serving ANY (one) of these roles;

  • Simple data storage – e.g. myComponent.score
  • Events – myEntity.WillDestroy(true) which functions something like myEntity.SendEvent (new DestroyMeEvent());
  • Visual things – e.g. myComponent.view.gameObject with some standard Unity renderers attached

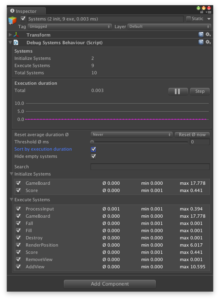
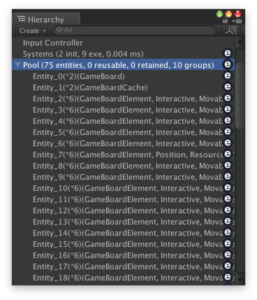
Visual Debugging

entitas_systems_v1Systems

entitas_pools_v1Entities

Performance

Based on data provided by the creators we see impressive run-time performance.

Unity vs Entitas. 1000 objects with 2 components;

  • Memory: 9x (2.9 MB vs 0.32 MB)
  • CPU: 17x (105ms vs 6ms)

Entitas is MUCH faster due to its many 0ptimizations: Entitas…

  • Reuses Entities
  • Reuses Components
  • Caches Groups
  • Index Components

Compared to a typical Unity game architecture, ECS processes logic only when processing is necessary. The Entitas system architecture and query system allows me to mix ‘processing’ strategies. For example with 100 characters onscreen I can;

  • Move all characters every monobehavior.Update()
  • Move half one one frame and the rest on another frame
  • Move only those who have a changed position
  • Etc…

Evaluation

Pros

  • FAST performance
  • Data-binding is implicit (OnEnityAdded/Removed/Updated, OnComponentAdded/Removed/Replaced)
  • Querying is fast, efficient, and opens your mind to new ways to think about your game.
  • ECS embraces Single Responsibility Principle (SRP) ( link )
  • Testability*
  • Code sharing (use C# on client AND server)*

* These features are greatly enabled because the UnityEngine.* classes are separated by-design from the bulk of your Entitas game logic. Testing UnityEngine.* has historic challenges. Running UnityEngine.* on server is either undesirable or impossible depending on your technology stack.

Cons

  • Developing with Entitas is easy, but refactoring has challenges (see Growing Pains below)
  • Best to START your project with Entitas
  • Best to FULLY embrace your project with Entitas (Rather than use Entitas partially in your game)
  • Collaboration takes effort between Entitas and existing code (e.g. AssetStore code)

Neutral (Things to get used to)

  • With Entias you may have MANY more class files
  • Entitas uses code generation (its optional, but I always used it).
  • You feel like the bulk of your Entitas code is disconnected from Unity. I consider this a PRO, but it takes some time to get used to. Ex. Its standard practice to NOT store your character’s position on the gameObject.transform.
  • Everything can access everything. There is a more ‘global’ state. Ex. your enemy’s code scope can fully access your hero’s health. The creators see standard OOP-based gaming structure as ‘little boxes’ (encapsulation) that you must break with every major refactor and game feature added, so instead there is much less emphasis on these ‘little boxes’ in the Entitas paradigm.

Growing Pains

Fixing compilation errors

The (optional) Enttias code generator is based on runtime reflection. The project has to compile before you can generate. This is not an issue when you creating new components, however when it comes to changing or deleting components, your code might stop compiling. Here is a list of recipes how you can avoid bigger hassle while changing and deleting components.

Ex. I stored the position of a character as float x, y, z. Then later changed it to a custom Vector3 class implementation. In a project without code generation your IDE’s ‘Rename’ or ‘Find-Replace’ functionality makes this pretty straight-forward. However, not all of the previously generated code will respect your refactor and a bit (30-60 seconds) of manually changes will be needed. Then once the project compiles again (you can use the Entitas code generation menu option to clean up the code again. I don’t have a suggestion on how, but improving this workflow is highly desirable. For now we have some helpful workarounds.

Use this advice to speed the process when doing the following tasks;

  • Renaming component fields
  • Renaming components
  • Adding new fields to a component
  • Removing fields from a component
  • Deleting a component
  • Renaming pool names

Resources

  • Official Entitas Homepage ( link )
  • Official Entitas Examples ( link )
  • My Entitas Template ( link ) – Use this as a starting point for your next project
  • My Entitas ‘Pong’ Game ( link ) – I started with the template and created a simple game


Unity UI: Overview – Part 1 of 3

Category: Quick Tips, Standards & Best Practices     |     Tags: API, C#, GUI, Unity3D

I’ve been lucky to focus the past years on Unity and C#. Much of my demos, full-games, and tutorial are here RivelloMultimediaConsulting.com/unity/. If you have any comments or questions, I’d love to hear from you. Twitter.com/srivello.

Traditional Unity GUI Solutions

Unity is an amazing ecosystem for game development. For years, even big fans of the tool have been critical of the 2D/GUI/Text systems offered. Unity and the Unity community have launched various competing GUI systems (both immediate and retained) but the lack of features and lack of consistency leaves much to be desired. Luckily the amazing Asset Store (See my articles one, two, and three) of 3rd party tools and components has dutifully filled the needs of many devs.

Maintaining robust state (e.g. button) and handling adaptive layouts with Unity Legacy GUI was always very challenging. – Me

Older Options

  • Unity GUI (Immediate): This has been renamed to ‘Unity Legacy GUI’ to limit confusion with UI in Unity 4.6.x. The Legacy GUI will continue to be available and will remain as the recommended solution for Tools development (creating new windows and panels within Unity Editor). It requires developers to program the GUI in a loop that runs repeatedly.
  • NGUI (Retained): By FAR the most popular solution in recent years. There are alternatives in the asset store, but this is the most prevalent. Designed by a fantastic developer Michael Lyashenko with extensibility, flexibility, and power in mind — this project excels. It will still be popular for the future too because so many projects and teams are already at home with it. In 2013, Michael was hired by Unity to lead development on Unity UI for 4.6.x. He has since left the project, but his positive impact on the structure of the new solution is obvious.

Unity UI 4.6.x

This is the ‘New GUI’ for Unity. It was released publicly in 2014 after a long private and public beta period. I feel that Unity really wanted to get it right. And I think they have done a lot to guarantee adoption and success. Due to the complicated history of the GUI within Unity, the naming of the new system was/is debated. Perhaps some day in the future we’ll just call it ‘the’ UI of Unity and the other options will fade away. Before we’re sure of that, let’s take a look at the system. It is great.

I am pleased, and frankly shocked that Unity UI is available in the standard (free) version of Unity. – Me

Unity UI Features

  • Fast and flexible workflows: The workflow feels very at-home within Unity. Want to render text with a font? Drag a font from your OS into your project and *boom* its immediately available for run-time usage. No more need to ‘convert’ fonts to bitmap fonts. Its just as easy with images too. You can reskin any of the existing components too using your own graphics.
  • Low memory allocations and high performance: With batching, texture atlasing and the new canvas component, we’ve come up with the optimal solution to allow your UIs to execute quickly on GPUs. Draw calls are kept low and performance remains high across all supported Unity platforms and device resolutions.
  • Easy multiplatform deployment: Intelligence about the sizing (and resizing) of the app as well as layout groups (see below) helps greatly.
  • Unique animation capabilities: Use the existing (awesome) ‘Animation’ panel to animate ANY public property of your UI. Listen for UI events (e.g. button click) and react with transitions to new layouts or new scenes.
  • Intuitive Layout Tools: Laying out and resizing elements is easy with the new Unity UI. Design detailed layouts using the Rect Transform layout tools, and automate grids of UI elements with our built-in components.

Each element that can be laid out (text, image, etc…) is considered a component. The list of current components is finite, but any developer can create their own components from existing components or from scratch. We expect the list of built in components to grow — both from Unity and from the community.


UI_Main

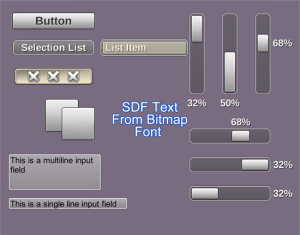
Main UI Components (as of Unity 4.6.1)

  • UI Canvas: This is the required hierarchy root-parent to all UI elements. You can have multiple in the scene. It comes in 3 flavors; Overlay (flat HUD), Camera (tilted HUD), and World Space (speech bubble that follows your character through the scene). ( Docs, Video )
  • UI RectTransform: ( Docs, Video )
  • UI Button: ( Docs, Video )
  • UI Toggle: ( Docs )
  • UI Image: ( Docs, Video )
  • UI Text: ( Docs, Video )
  • UI Input Field: ( Docs)
  • UI Slider: ( Docs, Video )
  • UI Scroll Rect: ( Docs, Video )
  • UI Scrollbar: ( Docs, Video )

Supporting UI Components (as of Unity 4.6.1)

Common ‘How To’ Tasks

  • Designing UI for Multiple Resolutions: ( Docs)
  • Adaptive Layout: ( Docs)
  • Creating UI from C#: ( Docs)
  • More: ( Docs)

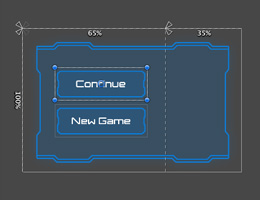
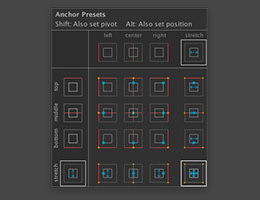
ANCHORING

flexible-anchoring

Take advantage of simple visual tools to anchor UI elements. The UI element maintains its anchored position regardless of changes to parent size or screen resolution. Want to anchor different elements relative to different positions on the canvas? No problem.

ADAPTIVE RESIZING

smooth-resizing

You can set UI elements to stretch along with the parent rectangle, or to maintain fixed margins inside it. In addition, each side of a UI element can be anchored individually, allowing you to set up sophisticated layouts without scripting.

ANIMATING UI

get-animated

Animation plays a key part in your new UI workflow for creating dynamic layouts with slick transitions. Animate any part of your UI layouts, from bouncing buttons to animated material properties for detailed motion.

What’s Next?

With each minor and major update of Unity I expect vast bug-fixes and new features with the UI system. It is very stable and ready for use already. So start experimenting! I am already working on a few upcoming posts that will explore the system in more depth. If you want to see me cover something in particular, add a comment beneath this page.

  • New Unity UI (4.6.x): Unity UI Part 2 of 3: Demo – Basic UI (Source code + Video) [Coming Soon!]
  • New Unity UI (4.6.x): Unity UI Part 3 of 3: Demo – Combining UI w/ Frameworks/Architectures for scalability (Source code + Video) [Coming Soon!]

Unity3D MVCS Architectures: StrangeIoC 2

Unity3D is a powerful suite of tools (Project IDE, Code IDE, run-time) for game development. In Unity3D Game Architectures I present six different techniques for setting up your game. Depending on the size and maturity of your team, you are probably doing some form of those. I recommend checking that article out first, then read below. In Unity3D MVCS Architectures: StrangeIoC (recommended reading before continuing) we dove deep into the great, free framework. I also explored an idea I had for an extension called PropertyChangeSignal. Here is more;

PropertyChangeSignal

To aid my work with StrangeIoC, I created a few classes that function together to reduce the workload. I call this the PropertyChangeSignal. Again we saw above that signals are used for many things. Speaking from a model’s perspective for every property (variable) you want to update in your model you may need SEVERAL signals. That is fine in my demo above with exactly one property, but imagine a ScoreModel with 5 variables, a TimerModel with 3, and a GameLogicModel with 25 more variables. You can quickly grow a HUGE list of signals. Now, creating a signal is super quick. It takes 30 seconds to create, and another 30 seconds to optionally bind it to a Command. Its certainly possible to grow your app in this conventional way (or some variety of this conventional way). Most people do exactly that. But I wanted a start a discussion on a different way.

Here is an example.

Let’s say we have a public message string in your data model and the whole app needs to interact with it.

A. Conventional Signals Per Property (4)

  • 1. requestMessageSignal.Dispatch() – If a mediator arrives on the scene late and wants to KNOW the current value of message.
  • 2. clearMessageSignal.Dispatch(targetValue) – If a command wants to CLEAR the current value of message.
  • 3. updateMessageSignal.Dispatch(targetValue) – If a command wants to SET current value of message.
  • 4. updatedMessageSignal.Dispatch(newValue) – After any updates happen, the model sends this out to those listening who can GET the value.

B. PropertyChangeSignals Per Property (1)

  • 1. pcSignal.Dispatch (new PropertySignalVO(PropertyChangeType.REQUEST) )
  • 1. pcSignal.Dispatch (new PropertySignalVO(PropertyChangeType.CLEAR) )
  • 1. pcSignal.Dispatch (new PropertySignalVO(PropertyChangeType.UPDATE, newValue) )
  • 1. pcSignal.Dispatch (new PropertySignalVO(PropertyChangeType.UPDATED, currentValue) )

So in B, we see far less signals used (1 vs 4), but an longer syntax for the call. Soon I’ll request your feedback based on the source-code.

Update:  Download the full source below.

Syntax Example

1. CONTEXT – SETUP BINDING

[actionscript3]

commandBinder.Bind<GameListPropertyChangeSignal>().To<GameListPropertyChangeCommmand>();

[/actionscript3]

2. COMMAND – HANDLE BINDING

[actionscript3]
public override void Execute()
{

switch (propertyChangeSignalVO.propertyChangeType) {

case PropertyChangeType.CLEAR:
//ASK TO CLEAR THE MODEL
iCustomModel.doClearGameList();
break;
case PropertyChangeType.UPDATE:
//ASK TO UPDATE A VALUE IN THE MODEL
iCustomModel.gameList = propertyChangeSignalVO.value as List<string>;
break;
case PropertyChangeType.UPDATED:
//FOR THIS PROJECT, THE VIEW LISTENS DIRECTLY TO ‘UPDATED’
//OPTIONALLY, WE COULD ALSO DO SOMETHING HERE IF NEEDED
break;
case PropertyChangeType.REQUEST:
//FORCE THE MODEL TO RE-SEND ‘UPDATED’ (WITH NO CHANGE)
//THIS IS VERY COMMON IN APPS (E.G. A TEMPORARY A DIALOG PROMPT)
iCustomModel.doRefreshGameList();
break;
default:
#pragma warning disable 0162
throw new SwitchStatementException(propertyChangeSignalVO.propertyChangeType.ToString());
break;
#pragma warning restore 0162

}

}

[/actionscript3]

3. MODEL – DISPATCH CHANGES
[actionscript3]
private List<string> _gameList;
public List<string> gameList
{
get
{
return _gameList;
}
set
{
//TODO: CONSIDER ALTERNATIVE THAT CHECKS "_gameList != value" BEFORE DISPATCHING
_gameList = value;
gameListPropertyChangeSignal.Dispatch (new PropertyChangeSignalVO(PropertyChangeType.UPDATED, _gameList) );
}
}

[/actionscript3]

4. VIEW – HANDLE CHANGES
[actionscript3]
private void _onGameListPropertyChangeSignal (PropertyChangeSignalVO aPropertyChangeSignalVO)
{
if (aPropertyChangeSignalVO.propertyChangeType == PropertyChangeType.UPDATED) {

doRenderLayout(aPropertyChangeSignalVO.value as List<string>);

}
}

[/actionscript3]

Video

[tubepress video=”87903532″]

Member Resources

Members can access the full source-code for this post. Membership is free.

[private_Free member]Enjoy this members-only content!

[/private_Free member]

Unity3D MVCS Architectures: StrangeIoC

Unity3D is a powerful suite of tools (Project IDE, Code IDE, run-time) for game development. In Unity3D Game Architectures I present six different techniques for setting up your game. Depending on the size and maturity of your team, you are probably doing some form of those. I recommend checking that article out first, then read below.

The Strange IoC Template

I consulted for years with PureMVC. From that, a spiritual successor with dependency injection was born as Robotlegs (RL). RL became my default choice for many projects. I’ve used both within the last year. Depending on client preferences. To share with the world a simple, consistent, starter project I created and shared a Template for PureMVC and a Template for RobotLegs. I continue that same ‘template idea’ for the article here. There is no popular version of those for Unity, until now. StrangeIoC is a fantastic, free implementation of Robotlegs plus Signals. Signals for C# comes from separate project available in other programming languages which replaces the standard use of Events dispatched often through a central Event Bus. The benefits of Signals are well known, but not everyone prefers them. I do prefer them, so my template exclusively includes Signals instead of Events. You can do either or both in StrangeIoC. You can play the unshockingly unsexy demo here, and then read about the internals here in the article, with full source-code (See ‘Members Resources’ below).

Figure 1. Click Image To Play “StrangeIoC Template”

Table of Contents

  1. What is StrangeIoC?
  2. My StrangeIoC Template
  3. My PropertyChangeSignal Extension for StrangeIoC

1. What is StrangeIoC?

Strange is a super-lightweight and highly extensible Inversion-of-Control (IoC) framework, written specifically for C# and Unity. The StrangeIoC team has validated Strange on web, standalone, and iOS (currently testing on Android).

Figure 2.

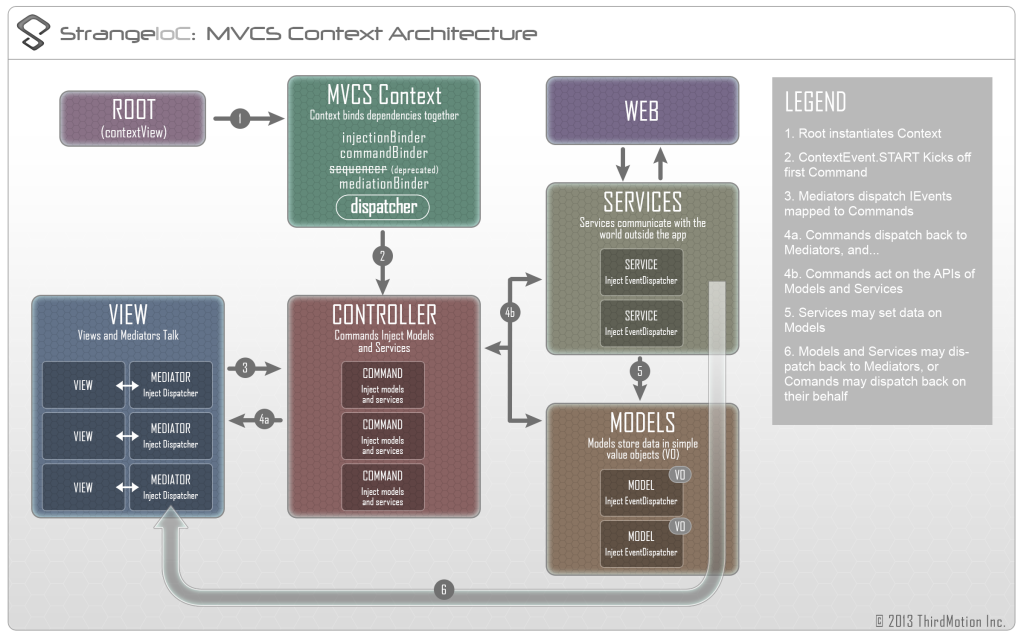
Figure 2. StrangeIOC Diagram

StrangeIoC includes;

  • IoC through Dependency Injection
  • Choice of Signals and/or Events (with 2 styles of EventBus)
  • MonoBehaviour mediation
  • Optional MVCS (Model/View/Controller/Service) structure
  • Multiple contexts (parts of your app can ‘care for themselves’ if desired)
  • And much more…

Pros:

  • Public, Community-driven, well-documented. (e.g. You can hire/contract a new developer who arrives with this skill on day 1)
  • Decoupled, testable, & D.R.Y.
  • Scales-up well for large teams, large projects

Cons:

  • Slower to setup (but faster to add last-minute changes)
  • Steeper learning curve, especially for junior developers
  • Demands discipline/know-how from your team to put logic in its proper place (but removes the ‘where should we put that code?’ decision process)

2. My StrangeIoC Template

While the MVCS setup for Strange is optional, it is my preference. To understand the template. It is absolutely necessary to understand the fundamentals before digging into my source-code. For those familiar with MVCS, the learning curve is very quick. For those familiar with Robotlegs, you are in luck, the creators of Strange have a special “Introduction to Strange for Robotlegs Users“. I haven’t read that, but in general the Strange documentation is very well written, light (fun?), and relevant.

Diagram
Figure 3. StrangeIOC Template Diagram
  Diagram
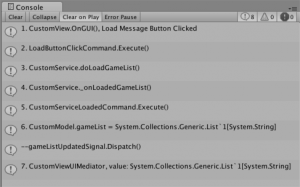
Figure 4. StrangeIOC Template Console

Pros:

  • Together with this article, I hope it the template is a GREAT way for you to learn StrangeIoC
  • Coming from PureMVC or Robotlegs? (Download and compare the similar templates for PureMVC and RobotLegs)
  • Intuitive for beginners, e.g. “Bowling-pin code goes on the bowling-pin”

Cons:

  • My style is just ONE way to use StrangeIOC. Every team should learn their own style.
  • It is a very, very simple example (this is also ‘pro’)
  • My Unity3D/C# coding standards are NOT the official Microsoft way. Ha!

Video

Part of the Unity With Cocktails video training series,  this video covers the “My StrangeIoC Template” section of this article. While the purpose and definition of MVCS is not explicitly included, there is some related tidbits in there. Also we see the ‘5 major steps’ in setting up StrangeIoC. 

[tubepress video=”82322606″]

More Info on MVCS

For the uninitiated to MVCS, let’s dig in! There is tons of info online so I’ll keep this section light (fun?). The basic idea is that you purposefully separate you coding stuff (‘coding concerns’) into 4 distinct areas which are discussed below. If the app doesn’t talk to any backend servers, you don’t need the service. So you often see the same basic structure described as MVC. But we’ll use MVCS just to be comprehensive.  So, looking at the diagram (Figure 3.) we can see some major areas of the application. The layout of this diagram mimic like the StrangeIOC Official Diagram above (Figure 2.). MVCS (for laymans)

  • Model – “I hold ALL of the data, ha ha ha.”
  • View – “Hey, look at this” (graphics, gui, sound) and “Oh, you clicked the mouse” (input), “Either way I’ll tell the controller about it”.
  • Controller – “Hey Model (or Service), someone clicked a button so do X or Y”, or “Service, you loaded? Ok, I’ll tell the model”, or “Thanks Model for the updated data, I’ll tell the view to show that”.
  • Services – “Welcome everyone, I’m going to just load stuff from offline files and online servers and tell the controller”.

Sample Orchestration: Clicking the Load Button Orchestration is my term for one ‘trip’ through some part of the MVCS for a specific purpose. Here we go from a button click to data storage and back to update the screen. We’ll step through the numbers from the console output (see Figure 4.). From View To Model Starting with the view (1), the user clicks the button in the UI, and the UI holding the button tells its paired mediator about it. The mediator sends a message (dispatches a signal which is mapped already to a command) and a command is executed (2). The command knows what needs to be done (a.k.a. business logic) and in this case that means to tell the service to load data from a local file (3). When the service finishes loading (4), its sends a message (dispatches a signal which is mapped already to a command), and a command is executed (5) which knows to put the freshly loaded data from the service into the model (6). From Model to View Continuing on, the model updates its internal data storage and then sends a message which anyone who cares can listen to. In this case the mediator is listening (7) and knows to update the UI.

Its important to note that while data started in the service and was passed around a bit before finally landing in the model, that – its the model that STORES the data as a class variable. The other data is temporary variables and they go away quickly. Its like wires that hold electricity temporarily but really only the battery STORES the electricity.

That sounds like a lot of steps. Yes it is. And for each ‘button’ or feature you add to the app you do something similar. However, very early in the learning curve you will both a) get fast at adding new features and b) see the benefits of mvcs.


3. PropertyChangeSignal

To aid my work with StrangeIoC, I created a few classes that function together to reduce the workload. I call this the PropertyChangeSignal. It helps to streamline your workflow in data-heavy applications where you need signals for data events such as REQUEST, CLEAR, UPDATE, and notify upon UPDATED.

Update: The complete article “Unity3D MVCS Architectures: StrangeIoC 2 PropertyChangeSignal” is ready. Check it out!


What’s next?

Want to learn something more basic? Or are you ready for more advanced topics about UnityEngine and C#? Checkout my “Unity With Cocktails” HD Tutorial Video Series on C# and Unity.

Member Resources

Members can access the full source-code for this post. Membership is free.

[private_Free member]Enjoy this members-only content!

[/private_Free member]

What are your thoughts?

Do you prefer an alternative to the suggestions above? Or do you have an additional recommendation? Please comment below. [polldaddy poll=7611650]

Unity3D Game Architectures

Unity is a powerful suite of tools (Project IDE, Code IDE, run-time) for game development.

I have explored many architectural approaches to game projects. Architecture is a hot topic in Unity — especially related to scaling up to larger Unity game projects.

My architectural background includes many frameworks. Highlights include heavy usage of Robotlegs (I event contributed to the project and drew the official diagram), PureMVC (I was the technical editor for the O’Reilly book on it), and PushButton (I published related articles for Adobe). I also presented and taught about the three at conferences and weekend workshops. Of these, only PushButton is a game-specific architecture, but all can be applied to games.

What are the qualities of a good gaming architecture? Most architects applaud solutions which are flexible, readable, D.R.Y., testable, orthogonal, and “refactorable” (at an acceptable cost). I will discuss the philosophy of design in a future post, but for now I simply list the major pros and cons of each approach.

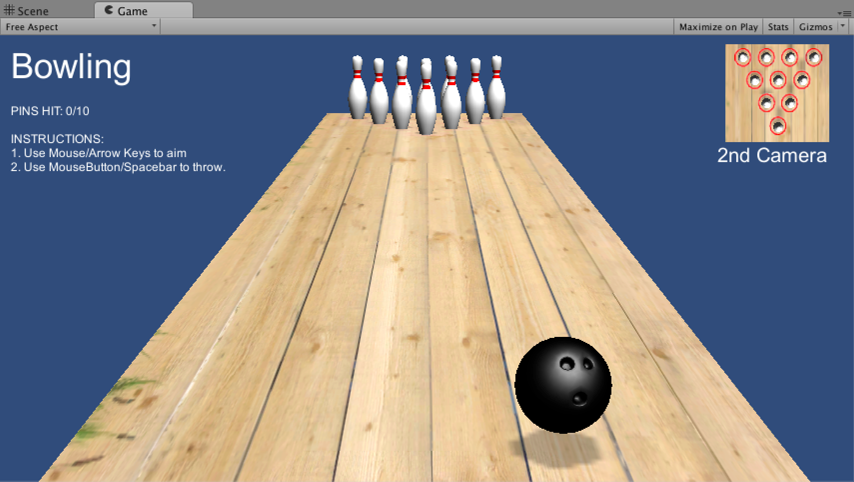
Unity3D Bowling

What are the qualities of a good gaming architecture? Solutions which are flexible, readable, D.R.Y.testableorthogonal, and “refactorable” (at an acceptable cost). I will discuss the philosophy of design in a future post, but for now, I simply list the major pros and cons of each approach.

Figure 1. Click Image To Play “Bowling”

I review some common approaches and a few novel ones. For each, there are images, details, and an example with full source-code (See ‘Members Resources’ below).

Table of Contents

  1. No Manager
  2. EmptyGO
  3. SimpleGameManager
  4. uMom
  5. Custom MVCS
  6. StrangeIoC

1. No Manager

This is your most basic approach. First-time Unity-developers often start with this technique. Here you put bowling ball code on the bowling ball, bowling pin code on the bowling pin, and ‘game win vs game loss’ code on something random, like the bowling ball too.

Because Unity’s ‘component-based’ approach is so intrinsically awesome (reusable code ‘components’ sit on 1 or more GameObject ‘entities’) you can indeed get very far using this approach. If you are coming from a hierarchical approach to gaming, learning the component-approach can be a challenge and your first projects may be of this ‘No Manager’ approach here in #1 or soon evolve to the ‘EmptyGO’ approach we see below in #2.

Diagram
Diagram
Diagram
Hierarchy

Type: Component-based

Pros:

  • There are MANY free, useful tutorials created using this “No Manager” approach. So its easier to learn the basics of Unity this way.
  • Flexibility for prototyping
  • Intuitive for beginners, e.g. “Bowling-pin code goes on the bowling-pin”

Cons:

  • It is the very definition of spaghetti code
  • Very low scalability for teams (of 3 or more)
  • Very low scalability for projects of intermediate or high complexity.

2. EmptyGO

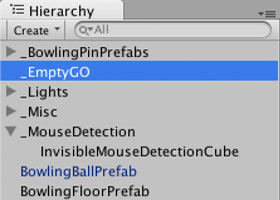
This is a slight evolution beyond #1 above. Still you put bowling ball code on the bowling ball, bowling pin code on the bowling pin, BUT you try now to put all the rest of code which has no visual representation in the world onto an invisible or ’empty’ GameObject (GO). Hence the name ‘EmptyGO’.

This technique still has alot of drawbacks, but at least we begin to see game logic more centralized (on that EmptyGO). This aids readability for newbies working on your project, or for you after you return to an older project after a long time. You don’t need to hunt around everywhere to find your core code — most sits there on the EmptyGO.

Diagram
Diagram
Diagram
Hierarchy

Type: Component-based

Pros:

  • More readable (than #1 above)
  • Good mix of flexibility for prototyping (yet not AS much spaghetti code as #1 above)
  • Intuitive for beginners, e.g. “Bowling-pin code goes on the bowling-pin”

Cons:

  • Less testable
  • Less refactorable (since less code is likely to be properly abstracted, decoupled, and reusable when compared to 3,4,5,6 below)
  • Communication and referencing between GameObjects is likely too brittle (e.g. using GameObject.Find() or inspector target references)

3. SimpleGameManager

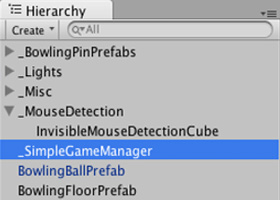
Probably the most mature technique which is in WIDE usage within the free tutorials and sample projects you find in the community is something like my SimpleGameManager technique. Imagine the ‘EmptyGO’ from #2 above, but now its a persistent (between scenes) Singleton.

Code still exists directly the GameObjects in the world, but whenever possible it calls centralized code [e.g. ‘SimpleGameManager.Instance.playSound (“GunShot”); ] Its a good approach and an appropriate (simple) solution for many small projects.

Diagram
Diagram
Diagram
Hierarchy

Type: Component-based w/ Manager

Pros:

  • Ultra-fast setup (but with minimal functionality). Its more of a racetrack — where YOU must supply the race-cars.
  • Persists between scenes, and if its not created it will create itself as soon as it is referenced (because its a Singleton).
  • Ideal for prototypes (but thus not scalable)

Cons:

  • Its not plug-and-play per say. The current workflow is to import the package and EDIT the core class, rather than use/extend.
  • Not D.R.Y.
  • Less testable. Much of your code STILL sits around on various GameObjects (like in 1 & 2 above).

Sample Game


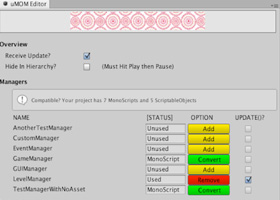
4. uMOM

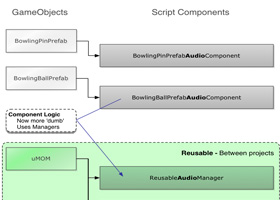
My (unreleased) uMOM Asset Store project arose from a problem inherent in Unity. There is no default Main.main() type ‘hook’ to centralize the entry into your run-time and no default way for UI and code to persist from scene to scene. This was the genesis of the Unity Manager of Managers (uMOM), pronounced as /you-mom/. You can read more at the uMOM Dev Diary and see the status of the project (it has some issues). Here is a short summary of purpose and benefits;

The uMOM package allows developers to add one or many reusable, custom manager classes to the project. Each ‘start’ automatically, have a predictable life-cycle (reset, add, update, remove), optionally receive ‘update()’ calls, optionally run during edit mode, and optionally persist between scenes. Managers operate as singletons and can easily address each other to collaborate.

Types of uMOM Managers: Really anything is possible, but here is the short list of use cases I will address first. Use some of mine or none of mine – then create your own. Most any existing manager class you have can easily be converted for compatibility here. 

  • uEventManager -Streamline messaging between classes. Replace the need for Unity’s clunky ‘SendMessage’ and instead dispatch strongly typed objects. (The uEventManager will also be available separately).
  • Store references to audio clips (drag-n-drop) and control audio playback via C# from one place.
  • GUIManager – Layout UI which optionally persists between scenes. Centralize the controls to handle clicks, etc…
  • PoolManager – Optimize your run-time performance by persisting GameObject or prefab instances in RAM and displaying them as needed.
  • LevelManager – Queue up levels and perform transitions (e.g. fade-in-out) between them.
  • GameManager – While other managers are not project specific, this one likely is. Here you manage the core game mechanics, how the user wins and loses, store the score, etc…
  • SaveManager: Takes care of saving and loading user preferences and achievements.
  • MenuManager: Controls all menus, managing their animations, their contents, and their behaviors. Perhaps it heavily uses the GUIManager for layout.
  • Much, much, more…
Diagram
Diagram
Diagram
Hierarchy

Type: Component-based w/ Manager

Note: The images and source-code for this architecture are not yet available.

Pros:

  • Reuse code between projects. That is probably its greatest strength. Ultra fast to setup with mucho out-of-the-box functionality. Nice GUI!
  • Have global access (also a con) to managers which are decoupled by discipline (GUIManager, LevelManager, AudioManager, etc…) each with a common interface and life-cycle.
  • Scalable to large teams such as 4-10 developers (but may require more planning upfront and dedicated team members creating the managers vs. those using the managers)

Cons:

  • The benefits of MVCS separation are not implicit ( but are possible ).
  • More scalable to complex games than 1,2,3 above, but far less than 6 below.
  • Still in alpha with bugs which prevent production-readiness.

5. uMVCS

For non-game projects, such as data-driven applications, there is a clear favorite in architectures; the Model-View-Controller-Service (MVCS or MVC). For the uninitiated, its where you separate your code into 4 areas; the data, the user interface, the core functionality, and any calls to/from backend-servers. It seems like OVERKILL at first, but once one is well-practiced he/she can drop in a template (e.g. Unity Package) and in 5 minutes  be ready to rock.

The “uMVCS” is a ultra-light framework I created myself. Its one of many, many setups for MVCS. I created recently, from scratch in just few hours for ACADEMIC PURPOSES ONLY. It is not complete and scalable like other implementations, but if you have never touched MVCS before, its a great way to learn.

Diagram
Diagram
Diagram
Hierarchy

Type: MVCS

Note: The images and source-code for this architecture are not yet available.

Pros:

  • Great for learning
  • Uses a custom event-dispatcher implementation of the observer pattern for decoupled communication from any scope to any scope.
  • Heavy use of Singletons (also a con) allows access to the ‘architecture’ from any coding scope.

Cons:

  • Purposefully incomplete, it exists just to help newbies learn about code-separation with MVCS.
  • No command-pattern.
  • I created it in 90 minutes. Ha.

6. StrangeIoC

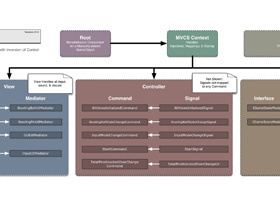
Here we add to organizational benefits of MVCS the ease-of-development feature called inversion of control (IoC). To learn more. Here is the official Strange diagram of the MVCS overview and the StrangeIoC website.

Diagram
Diagram
Diagram
Hierarchy

Type: MVCS w/ IoC

Note: The source-code for this architecture is available below. It works great, but upon clicking to restart it breaks. Still working on that. Have a solution? Download the source and comment below this post. Please!

Note: Updated! Now see my complete article on StrangeIoC For Unity3D

Pros:

  • Public, Community-driven, well-documented. (e.g. You can hire/contract a new developer who arrives with this skill on day 1)
  • More decoupled, testable, & D.R.Y.
  • Scales-up well for large teams, large projects

Cons:

  • Slower to setup (but faster to add last-minute changes)
  • Steeper learning curve, especially for junior developers
  • Demands discipline/know-how from your team to put logic in its proper place (but removes the ‘where should we put that code?’ decision process)

Sample Game


What’s next?

Want to learn something more basic? Or are you ready for more advanced topics about UnityEngine and C#? Checkout my “Unity With Cocktails” HD Tutorial Video Series on C# and Unity.

Member Resources

[private_Free member]Enjoy this members-only content!

  • Download Bowling Game source-code (1. No Manager )
  • Download Bowling Game source-code (2. EmptyGO )
  • Download Bowling Game source-code (3. SimpleGameManager )
  • Download Bowling Game source-code (6. StrangeIoC )
  • Update: April 2014 – I don’t think any more source will be added to this post, until I add a new architecture to the list some day.

[/private_Free member]

What are your thoughts?

Do you prefer an alternative to the suggestions above? Or do you have an additional recommendation? Please comment below.

[polldaddy poll=7611650]

Event Dispatching in Java

Category: Quick Tips     |     Tags: API, Experimental, Java

My professional focus is on client-side development. For a recent project, I re-learned some substantial Java concepts and completed server-side coding.

During the project, I was surprised to find there is no native java event messaging (event dispatching and event listening). While some UI frameworks have a solution, the solution appears to be coupled to those frameworks.

So I created a custom Java solution to handle it. The system uses common Observer pattern and modeled it after the spirit of what is present in ActionScript 3.0. I used abstraction and interfaces so its fairly decoupled and flexible. Take a look.

Usage

[actionscript3]
public EventsDemo()
{

// CREATE
SampleEventDispatcher s = new SampleEventDispatcher();

// LISTEN
s.addEventListener(Event.EVENT_NAME, this, "_onEvent1");

//TEST ‘HAS’
/*
if (s.hasEventListener(Event.EVENT_NAME, this, "_onEvent1") ){

//TEST ‘REMOVE’
s.removeEventListener(Event.EVENT_NAME, this, "_onEvent1");
}
*/

// TEST A DISPATCH OF EVENT (IN A FAKE, TEMPORARY WAY)
s.doDispatchTestEvent(new Event (Event.EVENT_NAME, this));

}

public void _onEvent1 (Event aEvent)
{
System.out.println (" _onEvent1(): " + aEvent + " , " + aEvent.getType() + ", " + aEvent.getTarget() );
}
[/actionscript3]

It rocks!

Next Steps

  • Download the code and check it out! (See Member Resources)
  • Comment below with your thoughts.

Member Resources

[private_Free member]Enjoy this members-only content!

  • Download my JavaDemos
  • Create ‘EventDispatcherDemo’ project set compiler dependency to project ‘RMCCodeLibraryJava’ and publish ‘EventDispatcherDemo’.

[/private_Free member]

Alternativa3D Engine for Adobe Flash Goes Open Source

Category: Industry News     |     Tags: 3D, API, Flash, Games

The Alternativa3D 3rd-party 3D engine for the Flash Platform recently announced it is going open source after 6 years of closed development. An example of this kick-ass engine is the recent release of LastStand Deadzone for Facebook.

The source code is published on the GitHub, and support can be found on the Knowledge Base and community discussion can be found on the forum.

No concrete reasons are given for the change to open source.

The Alternativa company hopes that the community will continue to use and extend the engine. It hopes this is only the beginning of a new life for the engine.

Going Open Source (Is Not Evil)

Going open source is interesting. Open source is the philosophy which promotes free distribution of a code-base and the community involvement to modify that code-base. Many AS3 projects start as open source and I think the general reception is ‘wow, thanks for starting this project, I may use it, and maybe I’ll even help extend it’. However the community response seems to be quite different if a close project exists for some time as a closed project and then goes open source. It feels to many like the project which was ‘created for my use for free’ now has been ‘abandoned’.

The community reaction to the Adobe Announcement that Flex went open source was strongly negative. Same when the popular Pushbutton Engine was recently rebranded as the community-based ‘Smash‘ game engine.

These fear based reactions are reasonable. The feeling is that what was once taken for granted as a concrete cared-for project now has a questionable future. However like most fear based reactions they are not beneficial reactions.  Project owners are free to chose if/when they release a project open source, and the community can care for a project or choose an alternative. The power is in the hands of the community.

Conversely, and open source project that becomes closed and introduces fees to the community (I have no examples of that) is indeed sad. But that is not the case here.

Stay Tuned

What do YOU Think?

  • Is going open source good or bad?
  • Please comment below.

The Scoreoid AS3 SDK

Category: Source Code     |     Tags: API, AS3

For a recent client Flash game project I needed a highscore table to be shown in-game and in-html outside of the game experience. I considered buy vs build and decided on find a great solution online.

There are a few contenders out there offering high-score tables and other things for Flash developers. Some are cost money. Most are free.

So what is Scoreoid?

As CasualConnect says – Scoreoid is a non-restrictive, reliable and easy to use gaming platform designed to handle scoring, leaderboards and game management, including advanced functions for multi-platform games such as platform content awareness to advanced player management, developed by game developers for game developers.

Scoreoid’s goal is to handle scoring and leaderboard functionality offering plenty of features to make games better; shortening game development time and costs, and giving developers time to work on their games.

What makes Scoreoid unique?

Unlike similar solutions, Scoreoid is focused on providing game developers in game features to help improve their game titles and at the same time focusing on giving game developer’s more time to work on their game. Scoreoid is also truly cross platform: with Scoreoid’s Open Web API there is no need to download SDK’s, no waiting for updates, and yes, Scoreoid works on every platform.

1. Easily create saved games
2. Create advanced leaderboards
3. Player management and in game notifications

Overall its really great. Scoreoid’s marketing is proud it has no download. It *is* cool that it is ‘language independent’ (independent from AS3 vs JavaScript vs Objective C++, etc…) however any project that uses it, will require quite a bit of boiler plate (boring code) just to get it into your game. Any scalable implementation of their framework would require developers (per platform) to create an SDK of classes and patters to use the API.

My Philosophy of API Design

  • Easy to learn –  Intuitive, readable, with good examples & documentation
  • Easy to use – Single entry point, KISS, adopts common standards, & has its own consistent language
  • Hard to misuse – Explicit error message suggesting parameters values & strong typing
  • Audience-appropriate / Sufficiently Powerful – Meet current needs and be (invisibly?) flexible for the future

My Scoreoid AS3 SDK

As the first comment below states, the terms ‘SDK’ and ‘API’ can be confused and unclear. I chose to call my work an ‘SDK’ in that it is a closed chunk of code that is language specific (AS3) to access Scoreoid’s server-side ‘API’.

Strong Typing

The SDK is meant to be a vertical slice representing 100% of a subset of the Scoreoid API. There is a method to initialize, to make the request, a strong typed request object, a response event (success and failure). Its 100%, EXCEPT I was thinking to make a strong object “also” for the response (this is not done, it stays a json/xml object depending on the request parameters). I use a custom implementation of ‘AS3 Enums’ to further this goal. Enums do not natively exist in AS3.

Snippet from My Scoreoid AS3 SDK

[actionscript3]

//INITIALIZE
Scoreoid.initialize(Configuration.SCOREOID_API_KEY, Configuration.SCOREOID_GAME_ID, Response.JASON);

//LISTEN TO REQUEST’S RESPONSE
Scoreoid.addEventListener(ScoreoidEvent.GET_SCORES, onGetScores );
Scoreoid.addEventListener(ScoreoidEvent.GET_SCORES_COMPLETE, onGetScoresComplete );
Scoreoid.addEventListener(ScoreoidEvent.GET_SCORES_ERROR, onGetScoresError );

//CREATE REQUEST – CONSTRUCTOR ACCEPTS ONLY THE REQUEST’S REQUIRED PARAMETERS
var getScoresRequest : GetScoresRequest = new GetScoresRequest();

//ADD OPTIONAL PARAMETERS
getScoresRequest.order_by = OrderBy.DATE;
getScoresRequest.order = Order.ASCENDING; //asc or desc
getScoresRequest.limit = "";

//DONT’ SET A START DATE
//BUT DO SET END DATE TO EXACTLY NOW
//getScoresRequest.start_date = new Date();
getScoresRequest.end_date = new Date();

getScoresRequest.platform = "";
getScoresRequest.difficulty = 0;

//SEND REQUEST
Scoreoid.getScores(getScoresRequest);

[/actionscript3]

It rocks!

Next Steps

  • Leave comments below. What do you think is great? What do you think is horrible?

Member Resources

[private_Free member]Enjoy this members-only content!

[/private_Free member]