Unity3D is a powerful suite of tools (Project IDE, Code IDE, run-time) for game development. In Unity3D Game Architectures I present six different techniques for setting up your game. Depending on the size and maturity of your team, you are probably using some form the archtectures presented there. I recommend checking that article out first, then read below.
A newer architecture called Entitas was presented at Unity’s Unite Conferences (2015 and 2016). I saw the most recent presentation and recently made time for a deeper dive to learn the basics.
I created a few projects. The full source is linked at the end of the article
Entitas Template – An ideal starting point for your next Entitas project
Entitas ‘Pong’ – I started with the template and created a simple, complete game
While making those projects, reading documentation, and dissecting other freely available Entitas projects, I learned a lot.
Entitas for C# / Unity3D
Entitas is a super fast Entity Component System Framework (ECS) with a version created specifically for C# and Unity3D.
As the creators explain — Entitas is open source. Internal caching and blazing fast component access makes it second to none. Several design decisions have been made to work optimal in a garbage collected environment and to go easy on the garbage collector. Entitas comes with an optional code generator which radically reduces the amount of code you have to write and lets you write code that is super fast, safe and screams its intent.
Groups – Hold groups of Entities (as a query optimization) – E.g. BulletGroup
Components – Hold public variables ( Has no methods) – E.g. VelocityComponent
Systems – Query entity/components ( Has methods to do logic ). Most of your code is here, typically acting on one or more groups. E.g. VelocitySystem
Controllers – Monobehavior that bridge the ‘unity world’ with the ‘ECS world’. E.g. InputController
Example:
The InputController (Monobehavior) listens for Unity.Input on Update. When the phone’s screen is tapped, the InputController creates an InputEntity, each with an InputComponent with data regarding the tap The InputSystem (ISystem) processes once, only when new InputEntities exist, and it updates the PlayerEntity‘s VelocityComponent. The concept of Velocity is processed separately to update the game properly, etc…
Note: Entitas Components are NOT Unity Components (aka Monobehaviors). Think of an Entitas Component as serving ANY (one) of these roles;
Simple data storage – e.g. myComponent.score
Events – myEntity.WillDestroy(true) which functions somethinglike myEntity.SendEvent (new DestroyMeEvent());
Visual things – e.g. myComponent.view.gameObject with some standard Unity renderers attached
Visual Debugging
Systems
Entities
Performance
Based on data provided by the creators we see impressive run-time performance.
Unity vs Entitas. 1000 objects with 2 components;
Memory: 9x (2.9 MB vs 0.32 MB)
CPU: 17x (105ms vs 6ms)
Entitas is MUCH faster due to its many 0ptimizations: Entitas…
Reuses Entities
Reuses Components
Caches Groups
Index Components
Compared to a typical Unity game architecture, ECS processes logic only when processing is necessary. The Entitas system architecture and query system allows me to mix ‘processing’ strategies. For example with 100 characters onscreen I can;
Move all characters every monobehavior.Update()
Move half one one frame and the rest on another frame
Move only those who have a changed position
Etc…
Evaluation
Pros
FAST performance
Data-binding is implicit (OnEnityAdded/Removed/Updated, OnComponentAdded/Removed/Replaced)
Querying is fast, efficient, and opens your mind to new ways to think about your game.
ECS embraces Single Responsibility Principle (SRP) ( link )
Testability*
Code sharing (use C# on client AND server)*
* These features are greatly enabled because the UnityEngine.* classes are separated by-design from the bulk of your Entitas game logic. Testing UnityEngine.* has historic challenges. Running UnityEngine.* on server is either undesirable or impossible depending on your technology stack.
Cons
Developing with Entitas is easy, but refactoring has challenges (see Growing Pains below)
Best to START your project with Entitas
Best to FULLY embrace your project with Entitas (Rather than use Entitas partially in your game)
Collaboration takes effort between Entitas and existing code (e.g. AssetStore code)
Neutral (Things to get used to)
With Entias you may have MANY more class files
Entitas uses code generation (its optional, but I always used it).
You feel like the bulk of your Entitas code is disconnected from Unity. I consider this a PRO, but it takes some time to get used to. Ex. Its standard practice to NOT store your character’s position on the gameObject.transform.
Everything can access everything. There is a more ‘global’ state. Ex. your enemy’s code scope can fully access your hero’s health. The creators see standard OOP-based gaming structure as ‘little boxes’ (encapsulation) that you must break with every major refactor and game feature added, so instead there is much less emphasis on these ‘little boxes’ in the Entitas paradigm.
Growing Pains
Fixing compilation errors
The (optional) Enttias code generator is based on runtime reflection. The project has to compile before you can generate. This is not an issue when you creating new components, however when it comes to changing or deleting components, your code might stop compiling. Here is a list of recipes how you can avoid bigger hassle while changing and deleting components.
Ex. I stored the position of a character as float x, y, z. Then later changed it to a custom Vector3 class implementation. In a project without code generation your IDE’s ‘Rename’ or ‘Find-Replace’ functionality makes this pretty straight-forward. However, not all of the previously generated code will respect your refactor and a bit (30-60 seconds) of manually changes will be needed. Then once the project compiles again (you can use the Entitas code generation menu option to clean up the code again. I don’t have a suggestion on how, but improving this workflow is highly desirable. For now we have some helpful workarounds.
Use this advice to speed the process when doing the following tasks;
For a complete introduction to Unity see my “Intro To Unity” Article. For a quick review: games in Unity are made up of multiple GameObjects that contain meshes, scripts, sounds, or other graphical elements like Lights. The Inspector displays detailed information about your currently selected GameObject, including all attached Components and their properties. Here, you modify the functionality of GameObjects in your scene. Any public field (publicly accessible variable) that is displayed in the Inspector can be directly modified while in edit mode and also while in play mode (the game is playing live). That is great.
The Inspector is a vital part of the Unity toolset with many powerful features. However, here I’ll focus on the specific programming-centric benefits of using the inspector.
Reasons
Gives us an (editable) view to all public fields on a game object.
Very powerful for experimentation, prototyping, and debugging.
Improves our interface to the code. E.g. instead of setting a color in code as #ff0000, you can have a GUI color picker in the inspector.
Example
[actionscript3]
public float myNumberField_float = 10f;
[/actionscript3]
NOTE: Only public fields are shown in the inspector.
NOTE: Adding the attribute [HideInInspector] before a public field name will allow it to be public (for coding) but not be shown in the inspector. This is outside the scope of this article, but it is quite useful sometimes.
Why Use Properties?
As we learn in C# In Depth, for every type you write, you should consider its interface to the rest of the world (including classes within the same assembly). This is its description of what it makes available, its outward persona. Implementation shouldn’t be part of that description, any more than it absolutely has to be. (That’s why I prefer composition to inheritance, where the choice makes sense – inheritance generally exposes or limits possible implementations.)
A property communicates the idea of “I will make a value available to you, or accept a value from you.” It’s not an implementation concept, it’s an interface concept. A field, on the other hand, communicates the implementation – it says “this type represents a value in this very specific way”. There’s no encapsulation, it’s the bare storage format. This is part of the reason fields aren’t part of interfaces – they don’t belong there, as they talk about how something is achieved rather than what is achieved.
I quite agree that a lot of the time, fields could actually be used with no issues in the lifetime of the application. It’s just not clear beforehand which those times are, and it still violates the design principle of not exposing implementation.
Reasons
Through encapsulation you now have a publicly accessible ‘thing’ just like a field, but here you can more completely control it. For example, within the set {} you could check the incoming ‘value’ and ensure it is between 1 and 10 before accepting the change.
Want to break into the debugger whenever the value changes? Just add a breakpoint in the setter.
Want to log all access? Just add logging to the getter.
Properties can be used for more advanced language features (like binding) too
Example
[actionscript3]
private float myNumberProperty_float = 10f;
public float myNumberProperty
{
set {
myNumberProperty_float = value;
}
get {
return myNumberProperty_float;
}
}
[/actionscript3]
Using Properties Via Inspector
By default, while Unity allows the inspector to shows with fields (variables), it does not render properties (getter/setters).
However, now you can do it all. I created the uExposeProperties (uEP) project. It is an asset store project for free. I’m hoping the community finds great uses for it. With uEP you get the best of both worlds; benefits of the inspector as well as properties.
Reasons
You get the benefits of the inspector
You get the benefits of properties
Your code stays very clean (only one simple attribute is added per property)
Example
NOTE: You must download the uEP package to use this functionality. It is not included in Unity.
[actionscript3]
private float myNumberProperty_float = 10f;
[ExposeProperty]
public float myNumberProperty
{
set {
myNumberProperty_float = value;
}
get {
return myNumberProperty_float;
}
}
[/actionscript3]
Drawbacks
There is one major drawback: theoretical performance. The current implementation depends on the OnInspectorGUI() event which is far more expensive than not using it.
Any ideas on how to improve that?
Next Steps
Download the source-code (See ‘Member Resources’). Available Now.
Get uEP on the asset-store (Coming Soon!)
Member Resources
[private_Free member]Enjoy this members-only content!
Here is a recap. In article 1 we used an RX approach for the following (academic) exercise;
Exercise: Dispatch a double click event based on custom timing parameters.
Reactive Extensions (RX) Solution
You can see the code is easy to read and powerful. While this algorithm requires state management, we don’t have to handle it directly. The internals of RX do it for us. You can imagine with a more complex feature, the code would be dramatically more than the RX solution. Below we break-down the code and explain each step.
NOTE: The TLP Library used in this article is a work in progress. It features only limited functionality and does not conform to common RX standards in the naming, signature, and structure of major elements. These differences are why the syntax and marble diagram names below are not 100% coincidental, but the concepts are similar.The TLP team invites other developers to fork the library and contribute to it. Still it is a fantastic learning tool and quite useful as-is.
Complete Code For RX Solution
[actionscript3 collapse=”true”]
//————————————–
// Methods
//————————————–
///<summary>
/// Use this for initialization
///</summary>
void Start ()
{
// VARIABLES
float maxTimeAllowedBetweenSingleCLicks_float = 1;
float delayBetweenAllowingADoubleClick_float = 5;
int clicksRequiredForADoubleClick_int = 2;
// CREATE OBSERVABLE
//(ORDER IS NOT IMPORTANT, BUT SUBSCRIBE MUST BE LAST)
var mouseDoubleClickObservable = Observable
//RUN IT EVERY FRAME (INTERNALLY THAT MEANS Update()
.everyFrame
//FILTER RESULTS OF THE FRAME
//WE CARE ONLY ‘DID USER CLICK MOUSE BUTTON?’
.filter (
_ =>
Input.GetMouseButtonDown (0)
)
//DID WE FIND X RESULTS WITHIN Y SECONDS?
.withinTimeframe (clicksRequiredForADoubleClick_int, maxTimeAllowedBetweenSingleCLicks_float)
//REQUIRE SOME ‘COOL-DOWN-TIME’ BETWEEN SUCCESSES
.onceEvery (delayBetweenAllowingADoubleClick_float);
//FOR EVERY EVENT THAT MEETS THOSE CRITERIA, CALL A METHOD
var subscription = mouseDoubleClickObservable
.subscribe (
_ =>
_onMouseEvent (MouseEventType.DoubleClick)
Marble diagrams are frequently in videos and blog entries from the Rx team explaining how certain operators in Rx work. From top to bottom there are; source stream(s), operators, and then the outgoing stream. The RXJava wiki has an especially pretty set of these images.
Let’s take a closer look at the syntax we used.
1. everyFrame: We observe an event stream on every frame (aka Update) in Unity…
2. filter: …where the mouse button is down…
3. withinTimeFrame: … X occurrences within Y seconds, which we call success…
4. onceEvery: …and success can only happen every Z seconds…
5. subscribe: …then call the desired method…
1. Operator: everyFrame (Similar to fromEvent)
From RXJava, we see that “the free-threaded nature of Rx is key to the performance characteristics of the event processing pipeline. However, in places where we bridge with the external world, this sometimes has negative effects due to thread-affine operations involved. The FromEvent [Pattern] bridges are one such place where we reach out to add and remove operations on events”.
Our specific use of everyFrame(), in pseudocode, would be like fromEvent (myMonoBehavior.Update).
2. Operator: filter
You can filter an Observable, discarding any items that do not meet some test, by passing a filtering function into the filter( ) method. For example, the following code filters a list of integers, emitting only those that are even (that is, where the remainder from dividing the number by two is zero):
3. Operator: withinTimeFrame (Similar to buffer)
The buffer( ) method periodically gathers items emitted by a source Observable into bundles, and emits these bundles as its own emissions. There are a number of ways with which you can regulate how buffer( ) gathers items from the source Observable into bundles:
4. Operator: onceEvery (Similar to sample)
5. Operator: subscribe
Subscribe is not an operator per se, it is something higher level in importance — When an observer subscribes to an observable sequence, the sequence begins and runs till completion. It is in the subscribe that we answer “What should ultimately happen with the outgoing event stream?”. In our example, we call a local method _onMouseEvent and we pass an appropriate MouseEventType.
NEXT STEPS
Our exploration into RX has just begun. Everyone interested is invited to download the source-code from my first article “Unity3D Reactive Extensions 1: An Introduction” and learn more. I continue to seek to find the best RX library for Unity development and have already begun to add RX into my game projects.`
Obviously fantastic software can be created without RX. We work without it every day. So why consider it? Well, essentially because asynchonous programming is hard to do, brittle, and is a challenge to scale. Well as the Reactive Manifesto explains;
The Need To Go Reactive – Each day applications are getting bigger, users expect more to happen in less time, and our projects are deployed to increasingly diverse set of (smaller) devices. To compete, old dogs need new tricks.
Reactive Applications – They react to events; loading data, user gestures, system failures.
Event-Driven – Event driven systems feature loose coupling between components and subsystems; a prerequisite for scalability and resilience.
Scalable – With RX our data runs ‘as if’ it is synchronous. Even the currently synchronous stuff. So as complexity comes and delays ensue, it can flex to be asynchronous. Secondly, the decoupled nature allows for location transparency. Benefits include multi-threading (where possible).
Resilient – In a reactive application, resilience is not an afterthought but part of the design from the beginning (see ‘onError’). Making failure a first class construct in the programming model provides the means to react to and manage it, which leads to applications that are highly tolerant to failure by being able to heal and repair themselves at run-time.
Responsive – The philosophies and practices of RX programming seek minimal latency to the user experience.
Conclusion – We expect that a rapidly increasing number of systems will follow this blueprint in the years ahead.
NOTE: While RX is designed to work with asynchronous data streams, it really doesn’t care. RX blindly accepts synchronous data within the same data flow.
Games
My first exposure to RX was regarding both UI behaviors (e.g. mouse events) and asynchronous data (e.g. loading from server). Gaming is inherently an asynchronous experience and the UI behaviors (e.g. user input) alone warrant a deep look at RX.
What is RX?
Iterables You are probably familiar with the concept of Iterables. In Unity we are used to using a List of values and looping through them and doing something synchronously. Observables In RX, it is observables that are a similar concept except the list may or may not be populated yet (i.e. it could start out empty) and may or may not be fully populated yet (i.e. ‘complete’). Still you iterate through the values, however asynchronously. Consider the following table;
Same Concept, Opposite Direction (Pull vs Push of Data)
Iterable (Pull)
Observable (Push)
getDataFromLocalMemory()
.skip(10)
.take(5)
.map({ s -> return s + " changed" })
.forEach({ println "next => " + it })
getDataFromNetwork()
.skip(10)
.take(5)
.map({ s -> return s + " changed" })
.subscribe({ println "onNext => " + it })
Reactive applications use observable models, event streams and stateful clients.
Reactive extensions (RX) is the library designed for Functional Reactive Programming (FRP). It is “a library for composing asynchronous and event-based programs by using observable sequences.” What is FRP? The name comes from the language features used and the philosophy of the data exchange (See Figure 1).
Figure 1. Functional Reactive defined.
According to Haskell.org, Functional Reactive Programming (FRP) integrates time flow and compositional events into functional programming. This provides an elegant way to express computation in domains such as interactive animations, robotics, computer vision, user interfaces, and simulation. The major parts of RX;
Observables – Source of event stream & Subscriber – Observer of event stream.
Linq – Query the event stream (e.g. filter, map, zip)
Schedulers – Define the timing (inc. frequency) of concurrency.
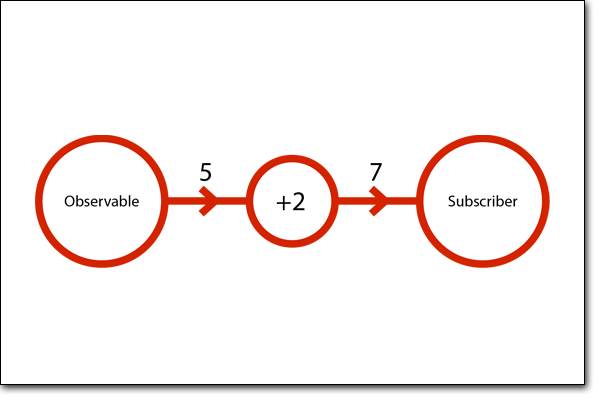
As a quick primer, consider the following Observer->Subscriber event stream (See Figure 2).
Figure 2. Observer-to-Subscriber Event Stream.
Here the Observable emits an integer, it goes through an operation that adds 2 to it, and is finally received by the Subscriber (Observer). All steps are asynchronous, which means the subscriber does not actually know that the original value had been changed.
Operators
Between the Observable and the Subscriber the event stream can be operated upon. Here is a partial list of operators;
Transforming
map( ) — transform the items emitted by an Observable by applying a function to each of them
scan( ) — apply a function to each item emitted by an Observable, sequentially, and emit each successive value
Filtering
filter( ) — filter items emitted by an Observable
takeLast( ) — only emit the last n items emitted by an Observable
skip( ) — ignore the first n items emitted by an Observable
takeFirst( ) — emit only the first item emitted by an Observable, or the first item that meets some condition
Combining
startWith( ) — emit a specified sequence of items before beginning to emit the items from the Observable
merge( ) — combine multiple Observables into one
zip( ) — combine sets of items emitted by two or more Observables together via a specified function and emit items based on the results of this function
How to do RX?
Let’s consider a very typical operation; using mouse input to perform a simple operation. Compare the non-RX and RX approaches to the following (academic) exercise;
Exercise: Dispatch a double click event based on custom timing parameters.
Reactive Extensions (RX) Solution
You can see the code is easy to read and powerful. While this algorithm requires state management, we don’t have to handle it directly. The internals of RX do it for us. You can imagine with a more complex feature, the code would be dramatically more than the RX solution. You can read an in depth analysis of this code in my next article “Unity3D Reactive Extensions 2“.
[actionscript3 collapse=”true”]
//————————————–
// Methods
//————————————–
///<summary>
/// Use this for initialization
///</summary>
void Start ()
{
// VARIABLES
float maxTimeAllowedBetweenSingleCLicks_float = 1;
float delayBetweenAllowingADoubleClick_float = 5;
int clicksRequiredForADoubleClick_int = 2;
// CREATE OBSERVABLE
//(ORDER IS NOT IMPORTANT, BUT SUBSCRIBE MUST BE LAST)
var mouseDoubleClickObservable = Observable
//RUN IT EVERY FRAME (INTERNALLY THAT MEANS Update()
.everyFrame
//FILTER RESULTS OF THE FRAME
//WE CARE ONLY ‘DID USER CLICK MOUSE BUTTON?’
.filter (
_ =>
Input.GetMouseButtonDown (0)
)
//DID WE FIND X RESULTS WITHIN Y SECONDS?
.withinTimeframe (clicksRequiredForADoubleClick_int, maxTimeAllowedBetweenSingleCLicks_float)
//REQUIRE SOME ‘COOL-DOWN-TIME’ BETWEEN SUCCESSES
.onceEvery (delayBetweenAllowingADoubleClick_float);
//FOR EVERY EVENT THAT MEETS THOSE CRITERIA, CALL A METHOD
var subscription = mouseDoubleClickObservable
.subscribe (
_ =>
_onMouseEvent (MouseEventType.DoubleClick)
This code requires us to ‘manually’ maintain state. You can imagine with a more complex feature, the code here would be even more long-winded compared to the RX equivalent. Thankfully we can use Coroutines, otherwise there would be even more state-specific variable setup to write and maintain.
[actionscript3 collapse=”true”]
/// <summary>
/// KEEPING STATE: Timing information
/// </summary>
private int _state_clicksInLastXSeconds_int = 0;
NOTE: The Unity source-code for this article is available (See ‘Member Resources’ below).
RX & Unity
Figure 3. RX & Unity
RX is a library that can be theoretically ported to any language. It currently exists in many languages; prominently Java and JavaScript. There are C# ports, but unfortunately not all are Unity-compatible. Unity’s (latest version 4.3.4) C# is compatible with an OLD version of Mono – Mono v2.65 (versus the latest available v3.2.7). Mono is the open source version of .NET which powers the C# language features of Unity. So, while RX libraries in C# are plentiful, there is not yet a Unity-compatible library which contains all the features we would like to see. All examples covered int his article are from the amazing people at Tiny Lab Production (TLP). Their RX library is available for free download (See ‘Member Resources’ below). The TLP team actively encourage use of and contribution to their library
RX Integration
Uses of RX
My first experimentation includes creating mostly non-RX games with few distinct RX elements (particularly mouse/key/gesture input scenarios). RX can be peppered into your project selectively. With more experience and awareness I expect the community to embrace more systemic usage of RX in Unity games. Ideas for RX In Gaming;
User Input (Mouse/Keyboard/Touch)
Constraints (keep player character onscreen)
Loading Assets
Loading From Backend Services
Multiplayer game state synchronization (e.g. ‘Did every player in this game room click start?’)
The RX library you choose must match your platform of choice. For me that is Unity & C#. Due to the “RX & Unity” issues above I can’t simply choose any C# library. The library chosen for this article was created by the fine developers at Tiny Lab Productions (TLP). I continue to search for a Unity-friendly library that has the scope and syntax exactly matching Netflix’s fantastic RxJava implementation.
NOTE: The TLP Library used in this article is a work in progress. It features only limited functionality and does not conform to common RX standards in the naming, signature, and structure of major elements. The TLP team invites other developers to fork the library and contribute to it. Still it is a fantastic learning tool and quite useful as-is.
Resources
While RX is new to the Unity Community, there are tons of non-Unity resources and tutorials available. Its important to note that until a robust Unity-compatible RX library is available all of the functionality may not be available. Here are some resources;
RxJava Documentation (A Must Read First) Functional Reactive Programming on the JVM (by the Netflix team)
The RX example above uses combinators to empower the event stream filtration and modification. Deeper explanation is available in my next article “Unity3D Reactive Extensions 2“.
Member Resources
[private_Free member]Enjoy this members-only content!
Seasoned game & game-engine developer Ben Garney has a new game development engine called Loom.
Ben demonstrates competency in a long series of projects. He worked on the Torque Game Engine with GarageGames at www.garagegames.com (Site No Longer Live), the PushButton Game Engine for Flash with PushButton Labs at www.pushbuttonlabs.com (Site No Longer Live). Support from PushButton (including its website, updates to its source code and forums) abruptly ended in 2012. PBE’s spiritual successor launched in 2012 as Smash Game Framework at www.smash.io (Project apparently dead after no updates since more than ‘a year ago’).
Now he and his team have Loom, The Loom Game Engine at www.theengine.co. The word ‘loom’ is used for a device used for weaving textile projects and Loom is also a popular 80’s computer game, both spiritually aligned with game development. However, I wish it had a more unique name to facilitate online searches.
Pros of Loom (Paraphrased from theengine.co);
Pragmatic Development – Loom features a lean and fast workflow without strict development rules or required frameworks.
Freedom Of Choice – Access and edit C++ core source code, access and edit LoomScript core source code, or simply add your own custom LoomScript. LoomScript sits atop C++ and can access any C++ library.
LoomScript – LoomScript is an easy to use, new language modeled after AS3 with features inspired by C#. LoomScript is based on Lua which is concise, robust, proven, and supported by tools, debuggers, and community.
Loom Architecture – Three parts; Call LoomCLI from your command line to create ‘new’ projects and ‘run’. The LoomSDK is precompiled LoomScript with powerful libraries. The NativeSDK is the raw C++.
Built For Teams – Three tiers; Artists can create & integrate assets into the latest build without bothering others. Scripters use LoomScript for the bulk of development. Need extra power? Extra features? Coders can access the C++ layer.
Pros of using one code-base for multiple platforms
When and where it is manageable, I am a huge fan of using and reusing the same project for multiple platforms. Loom 1.x currently exports to TV (Ouya), Desktop (Mac & Windows), and Mobile (iOS & Android). Future support for other platforms is in discussion on the loom forums.
Save Time – Develop, iterate, QA simultaneously cross-platform
Focus Marketing dollars – Instead of marketing the game on two platforms separately, we can do it at the same time
Momentum – Word of mouth dictates that downloads on one platform will possibly translate into downloads on the other
Maintenance – We’d rather be working on the next game, than debugging separate platforms
What is Loom?
With cheap, powerful tools and massive exposure to new game players, there has never been a better time for indie game developers. – Me
There are many available tools for indie game development. Loom is a powerful 2D game engine with live reloading of code and assets, a friendly scripting language, and an efficient command-line workflow.
Loom’s competitors include 2D-capable gpu-accelerated cross-platform mobile game development platforms such as Adobe AIR, Corona & Unity3D as well as the newcomer Stencyl. The approach each platform takes is diverse. Where-as Stencyl is the a complete IDE for project setup, art & development which requires no coding, Loom is a raw platform without even a GUI.
Checkout the screenshots of Loom’s Workflow;
Create a new project via command line.
Create your raster assets using your favorite creative programs.
Create your LoomScript code using any text editor. While a Loom IDE is a top feature request which is in active discussion, SublimeText is the current free, recommendation.
Compile (run) the project via command line.
1. Project
2. Assets
3. LoomScript
4. Compile
Development Philosophy
We believe that fast iteration times across multiple devices simultaneously lead to better, faster, cheaper game development. – Loom Documentation
Loom‘s design goal is to keep you on the fast development path as much as possible, while still preserving access to slower, more difficult, but still essential development paths. This gives a substantial benefit to development teams without blocking them.
The Loom GameFramework
Loom offers a powerful (optional) Loom GameFramework (LGF). A game framework is a system to organize your code specific for game projects.
LGF is made of three general types of classes. There may be many of each type in each game project:
Manager – Managers are the brains of the operation — each one has a unique task; for instance one focuses on the spatial area of the screen and the objects within it and one on graphics rendering of visible objects. Depending on its role in the game, a manager may or may not relate to entities and components directly.
Entity – Each visual element in your game is represented by an entity. This could be anything; your player, the enemies, collectible items, etc…. Entities can be non-visual too.
Component — Each entity contains components. This is where the bulk of your game code lies. Each components handle a specific responsibility. For instance perhaps one component handles rendering the entity in which it resides.
Developers can extend existing managers and create new managers too. LGF ships with managers for our most common needs. Here is a partial list of the managers packaged with the core Loom.GameFramework package:
TimeManager – Manages all time related functionality in the engine. It provides mechanisms for performing actions every frame, every tick, or at a specific time in the future. A tick happens at a set interval defined by the TICKS_PER_SECOND constant. Using ticks for various tasks that need to happen repeatedly instead of performing those tasks every frame results in much more consistent output. However, for animation related tasks, frame events should be used so the display remains smooth. You can pause/play your game easily here too.
ConsoleCommandManager – Process and dispatch commands issued via the asset agent.
PropertyManager – Properties are like public variables; set/get manually or bind automatically.
Entities are essentially empty shells. As a developer you fill them with the core components &custom components needed. Each component has access to any Loom API desired and responds to custom events as well as the following built-in Loom events:
onFrame – Best used for graphics rendering-routines; this occurs once per frame-rate (e.g. 60 times per second for 60 FPS). Included for AnimatedComponent
onTick – Ticks are guaranteed to happen at a fixed interval. If the frame-rate slows down due to some number-crunching or heavy rendering, Loom will attempt to ‘catch up’ by calling more ticks. It balances the run-time experience well. Included for TickedComponent.
onThink – Based on an arbitrary, per-use timer. This is ideal for AI code which can be processed slowly (e.g. every 1–5 seconds). Included for QueuedComponent.
Getting Started
If you have setup a programming environment before (Flash, Java, HTML5), then you should find Loom easy to setup and use.
Download examples – See the list of examples or download and view the source-code from the Loom downloads page.
Learn to run code with the examples and create new projects – Visit Loom getting started page and the Loom documentation page. Curiously, the class-by-class documentation is not available online, but is indeed downloadable.
Creating My ‘FlyerGame’
To learn Loom, I followed my own ‘Getting Started’ steps above and then created my own complete game. I used assets and game logic from “FlyerGame”, a game that I have recoded many, many times using game frameworks. The HD Video Screencast and source assets are available (See ‘Member Resources’ below).
Optimizations
I have limited experience with Loom, but from reading the Loom forums and reviewing the Loom example code I understand that optimizing a project – especially rendering with a constant frame-rate on a variety of devices takes time.
Conclusion
I like what Loom does well; LoomScript is light and powerful, the workflow is VERY fast. I haven’t tapped into the full strengths of device-specific CSS (e.g. to size a button uniquely on iPad vs iPhone) yet, but it looks really compelling.
Library of Libraries
Loom is based in great part to Cocos2d, a free community-based library for 2D gaming. Some people love and some people hate Cocos2D. A consciousness I see throughout the Loom forums is for ‘Loom’ itself to provide minimal functionality and instead depend on 3rd party libraries to provide developers with needed functionality. Some libraries will be folded into the Loom API and for others developers can mix and match libraries as they like. This ‘borrow vs build’ approach is not new. It is what provides huge functionality within the Javascript gaming world too. However, as a developer having a big bag of separate APIs (separate syntax, separate terminology, inconsistent value ranges…0 to 1 vs 0 to 100 vs 0 to 256) is not intuitive and severely hurts the learning curve. Furthermore such separation makes it hard in my opinion for Loom to compete in an all-too-crowded world of cross platform mobile game development tools.
Maturity
The product is both at “1.0” and costs money which to me means The Engine Co is positioning it as a finished product. However a look at the feature requests from the community and bug reports/omission from the forums, which include countless bare essentials (e.g. complete code documentation & incomplete method override support) is a sign it is not yet ready to stand against full realized competitive cross-platform mobile engine.
The engine also misses many device-specific features and most every OS-specific integration features (e.g. in-app purchase, social network integration, ad monetizations) which the forum promises are coming soon.
When the docs & wiki are complete and describe features which are implemented bug free the product can be recommended with more confidence. The team is working fast and communicates so frequently, that we may see that level of completeness very soon. A dedicated IDE (currently the #1 feature request) with auto-complete and more will help seal the deal.
Loom is very new and is changing rapidly. I reached out to Loom developers to get a reactions based on Loom CLI v#1.0.506 and Loom SDK v#sprint27.
PROs
Live Reloading – Greatly accelerates development
LoomScript – Easy to learn (especially from AS3) and powerful
Support – Loom dev team is open, responsive, and productive
I find the component-based architecture suggested in the Loom API to be powerful and a distinguishing feature among competitors.
CONs
Young platform – Has many bugs, missing basic implementations (“lots of loose ends”), and lacks must-have features of competitors
Lack of documentation, tutorials, & examples.
Rendering – The “CSS layout is pixel [dependent and] has little practical use”, and overall the “performance is not amazing”.
No full-featured IDE – Although a 3 code editors already provide partial support.
The lack of IDE is an obstacle for me. And the creator’s conscious choice to use existing 3rd party APIs to solve basic implementation needs is wise (provides functionality) but weakens the platform tremendously as it becomes a ‘bag of APIs’ which hurts the learning curve.
Gotchas & Advice
Read the docs
Download, read, and run the examples
Just “Dive into it!” and remake a basic game from scratch
“Is Loom ready for professional development?”
No, It is the “early days for the platform so there’s not so much”.
No, “standard mobile features like reading/writing to camera roll are not exposed yet (as far as I know)”.
Yes, I think its ready for professional deployment, If you can get over the bugs and [missing] features”.
No, we’d have to “spend a lot of time working on supplementing the engine, and less on making our games”.
And as one developer said – I am “not sure. I’d have to make a game with it!”
For me, Loom is absolutely ready for production in a vacuum. However there are many compelling alternatives to use which are more robust.
Next Steps
After ‘Getting Started’ and following my HD Video Tutorials, here are more resources to fuel your Loom savvy.
VIDEO: Welcome To Loom – Watch the HD Screencast Video Tutorial*
VIDEO: FlyerGame With Loom – Watch the HD Screencast Video Tutorial*
SOURCE CODE: FlyerGame With Loom – Download, view, and run the code.
Unity3D (or simply ‘Unity’) is a fully integrated development engine that provides rich out-of-the-box functionality to create games and other interactive 3D content. You use Unity to assemble your art and assets into scenes and environments; add physics; simultaneously play test and edit your game, and when ready, publish to your chosen platforms, such as desktop computers, the Web, iOS, Android, Wii, PS3 and Xbox 360.
Unity’s complete toolset, intuitive workspace and rapid, productive workflows help users to drastically reduce the time, effort and cost of making games.
There is incredible momentum in the Unity3D product and its community. Here is a look at Top Unity News Announcements.
Features
Pros of Unity3D (Paraphrased from Unity3D.com);
Multi-platform Development – Desktop (Mac OSX , Windows)
Multi-platform Deployment – Web Browsers (using the Unity WebPlayer), Desktop (Mac OSX w/ OpenGL, Windows w/ Direct3D), Mobile (iPhone, iPad, Android phones and tablets), and console (Wii, PS3 and Xbox 360). The Unity Editor emulates all your selected platforms too. The Unity3D Engine is gorgeous and performant. Unity even offers Union a way to license out your games to find an audience.
Powerful Coding – Unity makes it simple to keep your code working across many devices. Unity abstracts away the majority of platform differences. When precise control is needed, simply use #ifdef to specialize code per platform. Unity supports 3 languages that can be combined within the same project; C# (seems to be the most ‘professional’ option), JavaScript, and Boo programming languages.
Powerful Editor – Manage assets & code, drag and drop to build your scene (2D or 3D), the editor’s stage *IS* the Unity runtime (so you get high fidelity previews as you work), instant build times, see public script properties in the ID for easy viewing/editing.
Flexible Asset Workflow – Within the editor you don’t create assets per se, you import them (see docs & see supported formats) from other programs (all popular formats such as Photoshop and Maya) and manage them within your scenes.
Pros of using one code-base for multiple platforms
When and where it is manageable, I am a huge fan of using and reusing the same project (including all source and code) for multiple deployment platforms. Unity supports this very well.
Marketing dollars – Instead of marketing the game on two platforms separately, we can do it at the same time
Momentum – Word of mouth dictates that downloads on one platform will possibly translate into downloads on the other
Maintenance – We’d rather be working on the next game, than debugging two separate platforms
What is Unity?
Unity is the combination of a project editor, a code editor, and the run-time player. The project editor allows for creation of new projects, manipulation of 3D objects within the 3D world*. Its the glue that brings together your assets, your code and its where you performs the project builds.
*Note: Another tool such as the premium Maya or the free Blender3D studio max is required to do any complex modeling and animation.
The Unity Player (used only for playback in desktop web browsers) is gaining popularity. So is the popularity of developers using the Unity Editor. See these images;
Figure 1. Unity3D Stats
It takes some time to appreciate the workflow of Unity. A developer will likely have several applications open at once while working.
Checkout the screenshots;
Unity Editor: Create your project, edit the properties of your game objects, and build your game.
Create your assets using external tools (Photoshop shown); 2D, 3D, sound, etc… and import them into the Unity Editor.
Code Editor: Unity is compatible with any text editor and comes packaged with the very capable MonoDevelop code editing tools. MonoDevelop has formatting, syntax highlighting, intellisense, and autocomplete.
Asset Store – Within the IDE itself you can shop online to find assets of any type (2D, 3D, sounds, etc…) as well as ‘packages’ which are groups of reusable code which enable new C# functionality as well as add completely new UI* and tools within the Unity Editor authoring environment too. The organization of the assets is great. I get the feeling (so far) that the best way to find packages is through the store (vs Googling, downloading, & importing – which is also possible). However the store is dreadfully slow and buggy, I assume because it is just a clunky webpage loaded through the Unity IDE.
Note: The extensibility within the Unity Editor itself is inspiring. No other game development environment has 3rd party free and premium tools which actually change how the IDE itself functions.
Figure 2. Overview of the User Interface (UI)
Figure 3. Setup Game Sprites
Figure 4. Code Editor
Figure 5. Free & Premium Asset Store
Unity Design Philosophy
There is a hierarchy to everything in Unity; Project -> Scene -> GameObject -> Component -> Properties. Typically, when we talk about ‘things’ in our game we are talking about a specific ‘GameObject’ in a ‘Scene’. An empty game object contains just a ‘transform’ component (which is required). Using menu GameObject -> Create Empty you can make one and add it to the scene.
Two core, Unity-specific data types are;
GameObject: The GameObject is the base class for all entities in Unity scenes. It is not necessarily visual, but commonly is (e.g. Cube, Sphere, Plane)
Component: Created from MonoBehaviour, which is the base class every script derives from. Much of your code goes here.
The Transform Component
It is impossible to create a GameObject in Unity without a Transform Component. The Transform Component is one of the most important Components, since all of the GameObject’s Transform properties are enabled by its use of this Component. It defines the GameObject’s position, rotation, and scale in the game world/Scene View. If a GameObject did not have a Transform Component, it would be nothing more than some information in the computer’s memory. It effectively would not exist in the world.
The Transform Component also enables a concept called Parenting, which is utilized through the Unity Editor and is a critical part of working with GameObjects. To learn more about the Transform Component and Parenting, read the Transform Component Reference page.
You can see here (Figure 6.) how it is represented in the Scene Window, the Hierarchy Window, and the Inspector Window. You can see the Transform component which includes position and other properties. Also note the inviting ‘Add Component’ button. GameObjects exist so you can add components to them. The components do most of the work.
Figure 6. An empty GameObject
Other Components
The transform component is critical to all GameObjects, so each GameObject has one. Here (See Figure 7.) we see that GameObjects can contain other components (2-way purple arrow icons) too and components can refer to assets (cloud icon)
Figure 7. GameObject vs Component. From www.raywenderlich.com/
Component <-> Component Communication
Any class instance (of any type) can access one of the active GameObjects in the hierarchy via GameObject.FindObjectOfType( typeof ( MyGameObject ) ). For example your ScoreBoard class instance can access all the Enemy class instances to display a “Enemies: 5/10” display.
Within any one GameObject it is common that one or more Components will need to communicate. For example your keyboardInputComponent instance can call walkingComponent.walkRight(). Advanced developers may create their own solution to for need. However, for beginners, here are the popular techniques for Component <-> Component communication;
As mentioned each component contains properties. These are the granular values such as Mass, Drag, and Use Gravity (See Figure 8.) that affect how a component behaves. Not every variable within a component is editable, but all editable ones are exposed as properties through the inspector. At author-time and even at run-time you can edit these values. Very friendly for iterative development.
Figure 8. GameObject with 3D Physics
Editable Editor
One of the most shockingly cool features of Unity is that the Editor tool itself is completely scriptable.
Want a different icon to float over a particular GameObject in the Scene window? Script it!
Want a property editable in the Inspector window? Script it!
Want your custom components in main menu? Script it!
Want an entirely custom window (e.g. a home-made texture painting program)? Script it!
Everything scriptable about the Unity experience can be shared between your projects and with other developers (free or premium cost).
Gotchas
Unity’s complexity may have you scratching your head as you get started (and for years to come). It is a very deep and powerful tool. Here are some quick answers to some puzzling ‘gotchas’.
Only For The Third Dimension (3D)?
Unity3D, as its name suggests is a 3D-enabled IDE to create content in a 3D-enabled runtime. There is no option to NOT render your project in 3D. There are always x (width), y (height), and z (depth) to the positioning of every asset in your project. However, this does not mean you can’t create 2D gaming. By setting your camera’s perspective to Orthogonal, the camera will ‘render objects uniformly, with no sense of perspective’. Lock the z (depth) of every GameObject and WOW, now you have a 2D game running in a 3D engine. While this may sounds counter-intuitive or inefficient, it is not. This is the same way many 2D games are created on other platforms too.
Note: Any developers hoping to do 2D should strongly consider 3rd party Unity packages to assist the process. There is MUCH to learn and the tools are very helpful to both fill in the knowledge gaps and provide tools which make development much faster. One of the most popular recommendations for 2D in Unity is called 2DToolkit.
Editable Runtime
Probably the largest single source of confusion during your first day of unity is that you can EDIT your source while the project is PLAYING. There are 3 play controls in the IDE (and via the edit menu); play, pause, and step.
Click play to play and click pause to pause. The trick is that WHILE playing you can still use the IDE; you can drag things into and out of the live scene, you can move the camera, you can edit code, you can change assets, and more! This is very powerful, HOWEVER, once you click pause all of your changes are lost. So be sure you click PAUSE before you return to edit your scene. Obviously this feature is very powerful, you can tweak settings in your live scene without needing to pause/play again. Just be careful.
With the power of Unity there is A LOT to learn. Luckily the editor and the language features are intuitive and there are ample tutorials and sample projects to get started. Still, it is intimidating.
Prefabs
Prefabs are a collection of GameObjects (e.g. a 3D Mesh of your hero character) & Components (e.g. one unit of code that helps accept keyboard input to move your hero character) that can be re-used in your scenes. Several identical objects can be created from a single Prefab, called instancing. Take trees for example. Creating a tree Prefab will allow you to instance several identical trees and place them in your scene. Because the trees are all linked to the Prefab, any changes that are made to the Prefab will automatically be applied to all tree instances. Assets may be created by you or your team or downloaded for free or for cost within the app store within the IDE.
Asset Store
Unity’s Asset Store is home to a growing library of free and commercial assets created both by Unity Technologies and also members of the community. A wide variety of assets is available, covering everything from textures, models and animations to whole project examples, tutorials and Editor extensions. The assets are accessed from a simple interface built into the Unity Editor and are downloaded and imported directly into your project.
Getting Started
With the power of Unity there is A LOT to learn. Luckily the editor and the language features are intuitive and there are ample tutorials and sample projects to get started. Still, it is intimidating.
Here are the links and tips;
Download The IDE – Unity3D and install it. Its free. There is also a pay version with many (non-essential) additional features.
Watch My HD Screencast Video – Watch me talk you through as I create a complete game from start through finish. (See ‘Member Resources’ below)
Review My Sample Project Code – (See Members Resources below).
Making ‘FlyerGame’
To learn Unity3D, I created several simple, but complete games. I include one here to help you learn too. I used assets and game logic from “FlyerGame”, a game that I have recoded many, many times using game frameworks. The HD Video Screencast and source assets are available (See ‘Member Resources’ below).
Conclusion
Coming from a 13 years of Flash Player game development as well as JavaScript game development Unity feels at times a huge polished step forward yet also a clunky gaming-with-training wheels step backward.
The C# language – is AMAZING. I’m constantly figuring out new language features and powerful new ways to solve old problems. The language speed is great. The MonoDevelop code editor is very strong.
The graphics – and sound-performance is stunning. The quality of the output of desktop games from Unity is incredible when compared to any casual-game development platforms yet obviously less-so when compared to professional-grade commercial gaming platforms such as Unreal Engine and CryEngine.
Ease of development – considering how much you can do with Unity (huge 3D worlds for desktop vs simple 2D mobile games) it is easy to use. The Unity Editor is also very strong. Every game requires 1 or more scenes. That makes sense. Each scene requires at least one object inside – typically many. I still feel more comfortable if I could just bind a script to the scene (with no objects) and completely script the experience. Perhaps with time I’ll change my mind on that.
Community – I strongly DISLIKE that Unity has a history of many programming languages. Three are in use today. Perhaps for some there are benefits, but for me the obvious choice is C# and coming across tutorials, code samples, and projects in another languages (JavaScript or Boo) is a hassle.
Documentation – The Unity3D website, its documentation and its help section are all FANTASTIC. At the time of this article 5 of the 9 ‘learning modules’ have complete code and HD video. There is also one complete game project with 60-70% coverage so far with step-by-step tutorials. This is all new since Unity 4.x.
While researching technologies for a new Flash multiplayer gaming project, I came across Node.js as a backend techology. I’ve heard of it for a while, but have not yet used it. Its nice.
Node.js is a server software that allows you to a) run JavaScript on the server and b) talk to/from the client-side using http and socket connections. While not designed with Flash in mind, you can easily connect Flash (or Flex) to the socket connection and get real-time data flowing to/from. Very nice.
Uses for Node.js with Flash
What I think is immediately attractive is that you can easily setup a backend for your games. Its running in JavaScript which is easy to use and learn and the write-compile-test cycle couldn’t be faster. You could feed dynamic data to your game such as levels in a level based game. You could feed configuration information in so that you can easily edit it without editing your Flash project. You can create real-time data feeds or multiplayer gaming.
Note: Node.js is light-weight. You’ll have to code pretty much anything (multiplayer gaming) you want to add to it. It is a great starting point though.
Tutorial
I created the following example, and this post within an hour. Within 5 minutes you can setup your own running version of the demo shown in the post. Follow along here or simply download the full source code (See ‘Member Resources’ below) and check it out.
Note: I’m running the node.js server and the Flash swf on my local computer. I imagine this is where I would develop the full game. Its fast and easy to run/edit/run. Then I’d migrate the project to a server. I *think* its trivial to get this running up on a webserver for your users to enjoy, but I have not done that yet.
You now use the Mac OSX Terminal program on Mac (or Find any ssh terminal emulator program for Windows) to run Node. We’ll do that farther below.
Done!
B. Running the server on Node.js (via Socket)
Create a new text file HelloWorldNodeJS.js and save (anywhere?) on your local machine
Edit the file in your favorite text editor. For now, just enter the code below this list into that file and save.
Open Terminal and run one line – ‘node /path/to/your/dir/HelloWorldNodeJS.js’
Done!
[actionscript3]
// ————————————–
// Imports
// ————————————–
var net = require(‘net’);
var mySocket;
// ————————————–
// Construct The Socket
// ————————————–
// create the server and register event listeners
var server = net.createServer(function(socket) {
mySocket = socket;
mySocket.on("connect", onConnect);
mySocket.on("data", onData);
});
// ————————————–
// Events
// ————————————–
/**
* Handles the Event: <code>"connect"</code>.
*
*/
function onConnect()
{
console.log("Connected to Flash");
}
/**
* Handles the Event: <code>"data"</code>.
*
* When flash sends us data, this method will handle it
*
*/
function onData(d)
{
if(d == "exit\0")
{
console.log("exit");
mySocket.end();
server.close();
}
else
{
console.log("From Flash = " + d);
mySocket.write(d, ‘utf8’);
}
}
// ————————————–
// Start the Socket
// ————————————–
server.listen(9001, "127.0.0.1");
[/actionscript3]
C. Stopping the server on Node.js (via Socket)
Once you run B.3 above, the server runs and stays running unless you program your client or server to kill the connection. If you try to run B.3 without killing the connection you’ll see an error in Terminal (on Mac) containing “Error: listen EADDRINUSE”. To manually kill the connection (this is required if you want to edit and run B.3 again) then run the following sequence.
Open Terminal (on Mac) and run ‘ps aux | grep node’
This will show a series of lines like this ‘srivello PID 0.0 0.1 3064476 7152 s002 T 4:41PM 0:00.12 node HelloWorldNodeJS.js’.
Where you see ‘PID’ that is the PID. Your PID will be different it will be a #.
Then run ‘kill -9 PID’. Replace PID with your #.
D. Running the client in AS3 (via Socket)
Create a new Flash project using your favorite IDE. My example uses Flash Builder 4.6.x.
Edit your main document class. For now simply replace the class with the code below this list and save.
Compile and run the code. See your output window for the exciting details.
// ————————————–
// Class
// ————————————–
/**
* <p>The <code>NodeJSDemo</code> class is …</p>
*
*/
public class NodeJSDemo extends Sprite
{
// ————————————–
// Properties
// ————————————–
// PUBLIC GETTER/SETTERS
/**
* The core object which connects client to
* server for real-time communication
*/
private var _xmlSocket:XMLSocket;
/**
* The sole UI element to show some test output
*/
private var _textField:TextField;
// PUBLIC CONST
// PRIVATE
// ————————————–
// Constructor
// ————————————–
/**
* This is the constructor.
*
*/
public function NodeJSDemo()
{
// SUPER
super();
// ————————————–
// Methods
// ————————————–
// PUBLIC
/**
* Handles the Event: <code>Event.CHANGE</code>.
*
* @param aEvent <code>Event</code> The incoming aEvent payload.
*
* @return void
*
*/
private function _onAddedToStage(aEvent : Event):void
{
// CREATE THE SOCKET AND CONNECT – I’M NOT SURE WHAT PARAMETERS ARE VALID HERE
// BUT IT MUST MATCH THE SETTINGS WITHIN THE ‘HelloWorldNodeJS.js’ FILE YOU ARE USING
_xmlSocket = new XMLSocket("127.0.0.1", 9001);
/**
* Handles the Event: <code>KeyboardEvent.KEY_UP</code>.
*
* @param aEvent <code>KeyboardEvent</code> The incoming aEvent payload.
*
* @return void
*
*/
private function _onKeyUp(evt:KeyboardEvent):void
{
// HANDLE KEYS
if (evt.keyCode == Keyboard.ESCAPE) {
//1. SEND ‘KILL THE SERVER’ TO THE SERVER
_xmlSocket.send("exit");
}
else {
//2. SEND ANY NON-ESCAPE KEY’S CODE (’38’ FOR EXAMPLE) TO SERVER
// THIS IS A SILLY EXAMPLE OF SENDING A NUMBER TO THE SERVER
// JUST SO THE SERVER CAN SEND IT BACK. SIMPLE.
_xmlSocket.send(evt.keyCode);
}
}
/**
* Handles the Event: <code>DataEvent.DATA</code>.
*
* @param aEvent <code>DataEvent</code> The incoming aEvent payload.
*
* @return void
*
*/
private function _onDataReceived(aEvent : DataEvent):void
{
try {
// Show the server data in text
_textField.htmlText += ("From Server: " + aEvent.data + "\n");
//scroll down to show latest line
_textField.scrollV = _textField.maxScrollV;
Starling is a 3rd-Party AS3 framework For Flash Development. It mimics the Flash displaylist API but enables powerful 2D GPU-accelerated rendering.
With the help of the Hawaii Adobe Flash User Group, on Thursday April 26th at 5pm EST (2pm PST), I will give a live online screencast to explain more about Starling. Come join us!
Live, Free Online Training
Title: Introduction To Stage3D Flash Gaming With Starling Date: April 26, 2012 05:00 PM – 06:00 PM (GMT-5 Eastern Time US & Canada). Duration: 50-60 minutes. RSVP: The event is closed. Location: Free, On-line through Adobe Connect. The event is closed. Speaker: Samuel Asher Rivello is the principal of Rivello Multimedia Consulting (RMC). RMC’s Flash and Flex services include software architecture, consulting, development, and training. Sam has over a decade of experience creating games and applications, and is currently traveling the globe to collaborate with top companies. Sam is an Adobe Certified Designer and Developer for Flash, an Adobe Flex Champion, an international public speaker, and a university instructor. His writing and coding have appeared in leading publications such as Adobe’s “EDGE”™ online magazine, and Futurenet Publishing’s “Computer Arts Projects”™ print magazine.
Agenda:The session will start with the benefits of Flash for gaming and some new features. We’ll look at Stage3D – Flash Player 11’s GPU accelerated rendering pipeline for 2D and 3D gaming. The bulk of the session will be looking at code for a very simple, yet complete 2D game built with the Stage3D Starling Framework. All source code will be provided to attendees.
Bonus: Time-permitting we’ll checkout two hot Starling extensions – a vector graphics plugin and a particle effects plugin.
Next Steps
Now Available!: The full 65 minute recording of the online session (See ‘Member Resources’ below).
Now Available!: The full source-code will be available (See ‘Member Resources’ below).
Now Available!: The presentation slides will be available (See ‘Member Resources’ below).
Now Available!: The relevant links will be available
Member Resources
[private_Free member]Enjoy this members-only content!
[actionscript3]
//CREATE
_robot = new Robot("Robot");
//LISTEN
_robot.signal.add(_onRobotSignalGreeted);
//CALL
_robot.greet("It is me, the Robot!");
[/actionscript3]
What about the speed of AS3-Signals vs Events?
See this image from Ross Gerbasi showing a comparison in milliseconds (lower # is better/faster).
AS3-Signals and Robotlegs
I am a big fan of the Robotlegs framework for AS3. I’ve written about it many times. AS3-Signals is a completely separate project, but WOW these two play really nice together. In my series of custom project templates I created a specific Robotlegs w/ AS3-Signals Template. On a recent client project I chose Robotlegs and added in the optional AS3-Signals project.
As a speaker and consultant, I’m often asked a simple question about the Multimedia – “What should I learn and how should I learn it?” Years back I created a laundry list of resources and would forward it to interested parties. I’ve updated the list and it is below for all to enjoy.
UPDATE: This post is from 2009 and is generally focused on Adobe Flash. It may be useful to other types of developers too.
Part of the trouble with Flash development is that ‘Flash’ can do so many things. I’m lucky to meet talented individuals from a a dozen different disciplines that all use Flash; illustrators, animators, UI designers, hard core coders, professionals, students, teachers, managers, business developers, and hobbyists.
I wanted to take a step back and provide some insight and direction for how each other’s personalities can learn from the free, cheap, (and expensive) learning resources out there. I love to learn and love to teach. Happily I get to do a bit of both each week.
With the Multimedia Primer below, and reader contributed comments below it, I hope we can turn the maze of information overload into a network of sharing to help us all meet our goals.
ULTIMATE PATH LEARNING
Luckily, there are many great resources to learn. Wikipedia is a ridiculous resource. Its goal is to house the sum of humanities knowledge and provide it for free (WOW!). While Jimmy Wales is working on that gem, take a look at the list below. I hope it helps.
The road to learning is not easy. Its easy to get burnt out on a project all day and feel lifeless to sit down at night and learn for learning sake. I invite yo to find and focus on your end goals (whatever that means for you), get inspired to build passion, and burn that passion as you work your ass off to meet your goals.
Thanks in advance to all those who helped me learn in the past and continue to fuel me in the future. If you love or hate any of my links or can suggest others, please leave a comment!
BEST WAYS TO LEARN (ANYTHING)
Get excited! Learning about what interests you is like swimming WITH the current.
Get Paid to do it!If you or your manager does not allow for 20% of work time to learn, think seriously about making a major professional change and get on the trendy train of seeking more balance in your life (see # 7.5). When planning projects, don’t just take ones that are easy. Challenge yourself to accept new projects which are calculated-risks balancing familiar core concepts with some new-to-you tasks too.
Get Pressure! Some pressure is good pressure. By placing time-sensitive criteria to specific goals ( I will learn how to float an image in CSS by the 1st day of next month), you are holding yourself accountable. We resist these types of deadlines for only one reason: We are afraid to ‘start’ something we may not finish it. Mark it on your calendar, START IT, and finish it. You’ll be far more thankful at the end of 30 days if you meet a few learning goals than if you managed to watch another dozen repeats of ‘The Office’ on TBS. (Awesome show BTW)
Give Back! Its amazing how much you can learn by helping others. Showing someone a new technique, sharing a favorite book, or other things (like writing an amazing blog post, HAHA!) are all fantastic ways to re-learn the fundamentals, practice articulating concepts, and align your chi.
1. Resources from RMC
Learn from the tutorial resources available for digital software and programming.


 Diagram
 Fundamentals
 Entities